


Snelle verzending
Vandaag besteld, vandaag verzonden, bij bestelling voor 16:00 uur.

~7000 producten
Het grootste assortiment van heel Europa.

Razendsnelle support
Bel, Whatsapp, Email of bereik ons via social media bij vragen.
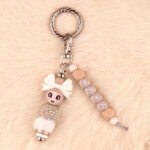
DIY Siliconen Kralen Pakket – Clip-on Tassenhanger – Mama + Meisje – Wood
Materialen: Siliconen kralen & Metalen Hanger
Moeilijkheidsgraad: Simpel – Gemiddeld
Dit setje bevat alle benodigdheden voor het kunnen maken van een zelfgemaakte clip-on tassenhanger van siliconen kralen. In dit geval specifiek de tassenhanger met het meisje in Wood en de tekst Mama. Wij benoemen hierboven ook alle materialen uit dit setje. Mocht je een item willen vervangen, bijvoorbeeld een brunette meisje voor een blond meisje dan kun je deze zelf samenstellen. Je zoekt dan eenvoudig op onderstaande benodigdheden en vervangt dan het meisjes siliconen gelukspoppetje door een andere. De meisjes vindt je onder de luxe kralen de afdeling Gelukspoppetjes / LuckyJo Hoofdjes en Lijfjes.
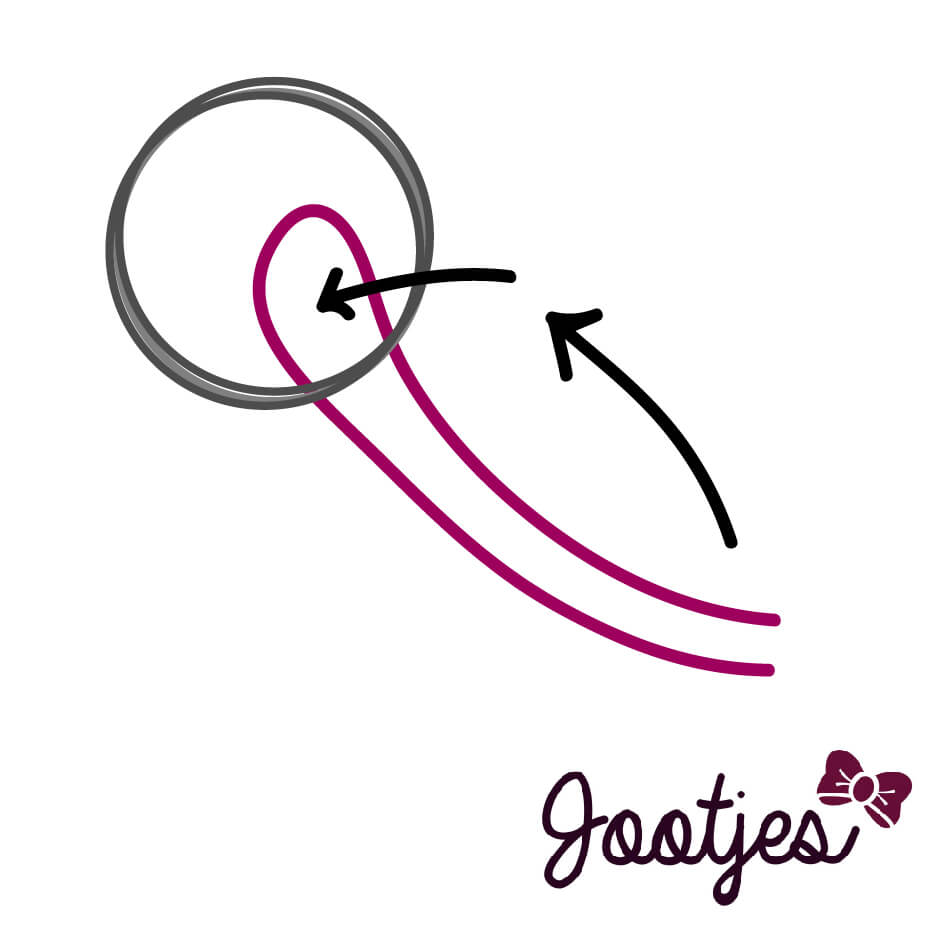
Een hanger zoals deze is heel eenvoudig te maken. Wel raden wij hierbij het gebruik van een combinatietang aan. Heeft u deze nog niet, dan vindt u deze ook terug bij onze gereedschappen. Allereerst wordt er een Clip-on haak geleverd. Dit is een ronde haak met daarin een segment wat naar binnen kan klappen. Deze ring is wat groter dan een standaard sleutelring en past daardoor perfect rondom het handvat van een tas. Aan deze Clip-on Ring gaan we de hangers maken.
Om te beginnen het gelukspoppetje. Je krijgt een hanger geleverd. Hiervan zijn de bolletjes boven en onder los te schroeven. Nadat je één van beide zijden hebt los gedraaid rijg je hierop de kralen. Vervolgens druk je deze goed aan op het staafje (het gehele schroefdraad moet vrij blijven) en hou dit goed vast in één hand. Draai met de andere hand het bolletje er weer op. TIP: Sommige combinaties zijn wat “voller”. Druk hierbij eerst goed aan op het staafje zodat je makkelijk het bolletje kan aandraaien. Doe je dit niet, dan drukken de siliconen kralen soms al vrij snel op het bolletje, ondanks dat deze nog maar een klein stukje op het schroefdraad zit aangedraaid. Dit kan slecht zijn voor de kwaliteit voor de schroefdraad.
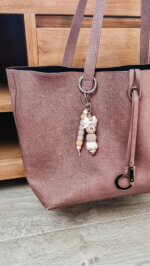
Deze hanger gaan we verbinden met de Clip-on haak. Je kunt deze direct aan de ring hangen, maar wij vinden het handiger om met een musketonhaak te werken. Dit ook omdat we er nog een tweede hanger bij gaan maken. Hierbij komt de combinatietang van pas. Je buigt het bovenste ringetje van de hanger open, haakt deze aan de musketonhaak en drukt deze weer dicht. Heb je een wat grotere / grovere combinatietang, dan kun je er bijvoorbeeld een klein stukje keukenrol tussen doen. Op die manier beschadig je de hanger zelf niet.
Vervolgens gaan we aan de “Mama” hanger. Dit maken wij eigenlijk op eenzelfde manier als een doodgewone sleutelhanger. Je pakt het zilveren satijnkoord en legt dit dubbel. Nu heb je aan één zijde een lus en aan de andere kant twee uiteinden. Dan kijken we naar onze hanger die we al hebben. Aan de onderkant van de musketonhaak die we net hebben gebruikt zit een ringvormig deel, hieraan hebben we net de metalen hanger gemaakt. Ook hieraan gaan we de Mama hanger maken. Je pakt het satijnkoord bij de kant van de lus en rijgt dit een stukje door deze opening heen. Vervolgens pak je de uiteinden en deze doe je door de lus en trekt aan.
Je kunt nu de kralen hieraan gaan rijgen. Optioneel is om boven in een knoopje te maken alvorens je gaat rijgen en je kralen er overheen te trekken. Wij doen dit zelf meestal niet omdat we er graag voor kiezen kleinere kralen te gebruiken en je de knoop hier niet zo goed in weg kan werken. Daarnaast vinden we het weinig bijdragen voor een creatie zoals deze. Het voegt eigenlijk niets toe. Nadat je alle kralen er op hebt geregen moeten we nog een knoop maken. Voor sleutelhangers raden wij het aan om geen platte knoop te gebruiken. De uiteinden hebben dan namelijk de neiging om naar links en naar rechts te gaan staan. Wat je doet is je legt een e-vormige lus op tafel waarna je de uiteinden door deze lus heen doet.
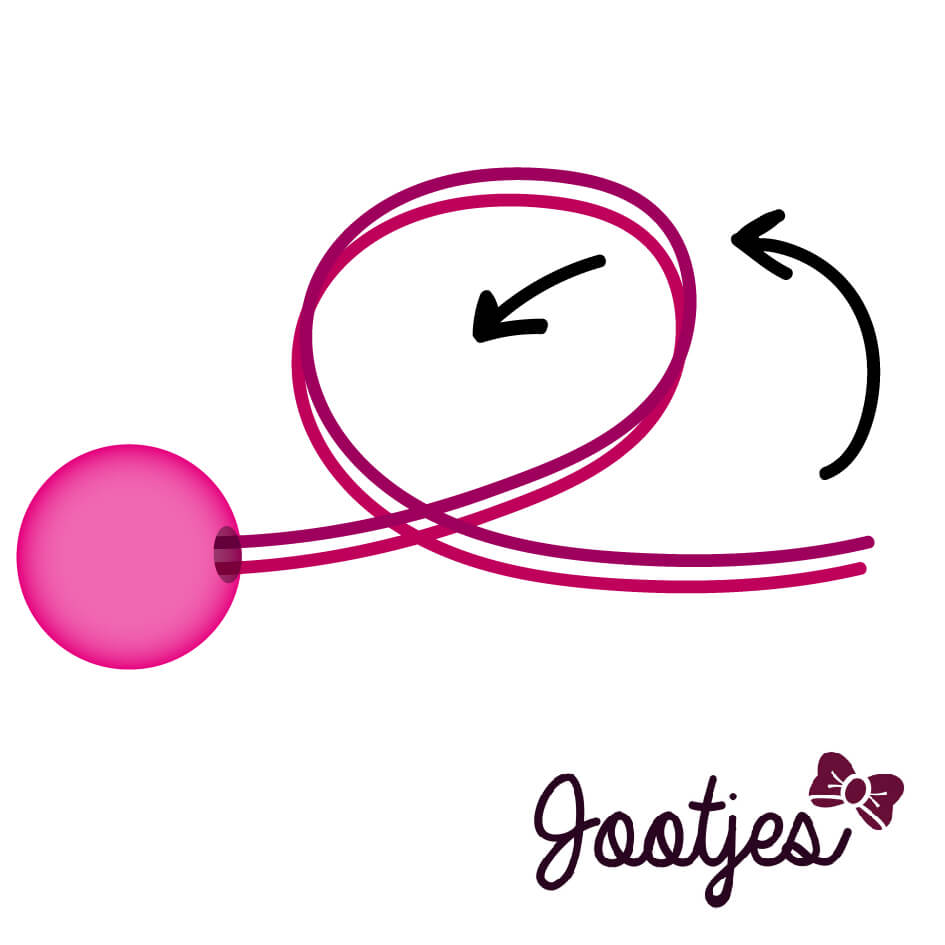
Trekt dit eerst heel rustig richting de kralen. Vervolgens zorg je ervoor dat de kralen zo strak mogelijk op het koordje zitten tegen de sleutelring aan. Daarna schuif je met je andere hand de knoop zoveel mogelijk op en trek je de knoop vast. Deze manier van sleutelhangers maken is een echte musthave vaardigheid. De eerste keer is het mogelijk even oefenen, maar naar mate je het vaker doet gaat het steeds makkelijker! Je knipt de uiteinden na ongeveer 1 cm na de knoop af. Nog een tip, brand de uiteindjes heel kort met een aansteker. Ik doe vaak de aansteker aan en doe in een soepele beweging net even de uiteindjes er langs/erdoor. Hierdoor gaat jouw sleutelhanger niet rafelen.

